Here's some advice for those who ask, should I root my phone ? No
. Don't do it.
Rooting a phone means using programs to grant root access privilege to the phones files and operating system. It's not easy and it's not something to take lightly and you may ruin your phone.
What's root access ? It originates from the development of Unix. Root is the user name or account that by default has access to all commands and files on a Linux or other Unix-like operating system. It is also referred to as the root account, root user and the superuser.
If you don't like how your phone works and certain things are annoying you or you just want it to look and behave differently, put a third party launcher on it like
Nova launcher or
Go launcher.
A launcher replaces your home-screen, and you can then control how it looks. You can change the themes, colors, scroll effects, removing the app dock bar at the bottom of the phone, and so on.
(
Anything in blue is just a highlight, not a link).
Here's some links to Google Play for launchers.
Nova - I use this launcher on all my phones.
https://play.google.com/store/apps/details?id=com.teslacoilsw.launcher&hl=en
Go
https://play.google.com/store/apps/details?id=com.gau.go.launcherex&hl=en
There are plenty more and they're all fun to play with without ruining your phone.
Anyway, all that aside, I put root access on my
Samsung Galaxy S3 because it never worked well and then wouldn't boot at all. It also had too much bloatware that ran in the background that I couldn't delete.
I found the original ROM from Samsung and used
Odin to flash it onto my phone.
I then used the
Kingo website to install root access on my now working phone.
Next is to allow
USB debugging.
Then I installed
TWRP to control my installations and wipes of ROMs.
Finally I installed the
CyanogenMod by copying the downloaded zip file to an SD card and flashing it using TWRP.
It was a long and slow process with many trials and errors.
The end result is good and worth the trouble. Now I can easily change the ROM and try out new ones such as
Carbon and
AOPK.
I now have much better battery life - two or three days, rather than just one day.
I have complete control of the phone with a lot more options to tweak it in every way.
I have super user / root control to change permissions for apps and to delete any app.
This is what you need to did. This are the steps I followed for a phone that wouldn't even boot.
* Find a good quality USB data cable, not just a recharge cable.
* Charged the phone to full.
* Go to
http://forum.xda-developers.com/ and read everything you can about rooting your phone. I couldn't have done it with all the help in the forums. This post was my guide...
http://forum.xda-developers.com/galaxy-s3/help/guide-odin-flash-guide-t1671969
* Downloaded the original ROM from Samsung.
Mine was called
International-GT-i9300-StockRecovery.tar
I found it from a Google search from here...
http://www.drawbycode.com/blog/?p=336 and followed their link to here.
http://stockroms.net/file/GalaxyS3/i9300/stockrecovery/International-GT-i9300-StockRecovery.tar
Go to the bottom of the page and wait 5 seconds, fill in the Captcha and then download the file.
Here's my folder of ROMs and root programs that I have downloaded. It's important to keep it organised.
* Download and installed Odin to your computer from here...
http://odindownload.com/ ... and start it up and minimise it for now.
* Press and hold whatever buttons puts your phone into
Download mode.
For me it is
Home + Volume Down + Power
Then I see this...
* Press Volume Up to continue to Odin mode.
* Plug your phone in to a USB cable and attach to your computer. If nothing happens to Odin, you probably don't have a data cable. Change your cable and plug your phone in again and Odin should light up.
* Next I flashed my
International-GT-i9300-StockRecovery.tar to my phone.
* Leave all the cables attached and touch nothing, don't even move the phone in case you disturb the connection. Your phone should now reboot into normal mode. Mine did anyway.
Now I have a phone that actually boots to a normal Android existence.
* Go to
Settings - About Device and touch on
Build Number seven times to enable
Developer Mode.
* Go back one level to
Developer Options and allow
USB debugging.
* Next I Rooted my phone using the Kingo program. This was easy.
Go to
http://www.kingoapp.com/ and download the program.
* Start the program and plug your phone into that same USB data cable.
All done. Your phone is now rooted and you have superuser control to delete bloatware programs and so on.
* Go to the Google Play market and download Root Checker to confirm that you do have Root Access. Pay for the PRO versions to support the dev's.
https://play.google.com/store/apps/details?id=com.joeykrim.rootcheck&hl=en
Run that app on your phone to check.
and also grab SuperSU to allow Super User control of apps.
https://play.google.com/store/apps/details?id=eu.chainfire.supersu
* Next is TWRP to control the installation and Wipe of your custom ROMs.
I found mine here.
https://github.com/TeamWin/android_device_samsung_i9300
OR
Read here ...
https://twrp.me/devices/samsunggalaxys3internationalexynos.html
Download the .tar here ...
https://dl.twrp.me/i9300/
* Go back to Odin.
Shut your phone down.
Put your phone back into
download mode which for me is
Home + Volume Down + Power
I then press Volume Up to go to Odin mode.
Plug your phone into your computer again and flash that .tar file using the AP key as per the above pictures.
My phone then rebooted itself to normal mode.
* Next step is to boot to
Recovery mode. I press
Home + Volume UP + Power, note UP
, not DOWN this time. There it is. TWRP at last. This has been my aim for a few days of trial and error and much reading on XDA.
First thing I do is make a backup just in case. I can use this to
Recover my phone if I make a mess of things... which I did.
Note that TWRP survives on the phone no matter what you do. You can Wipe and Backup and Recover and TWRP is still there when you press buttons to go to Recovery Mode.
* Now the next tricky bit. Find the
correct ROM for you phone along with the
correct "gapps".
I put my first ROM on , I think it was Carbon, and I didn't realise that there were no Google Apps in the package.
I worried my at first, but I enjoyed having a good play with the phone and all the settings.
It's quite novel to have a phone stripped back to just an message app, email client and a web browser and not much more. I played with it for about
four days before it even needed a charge because there were no other apps running in the background such as Google Play Service.
So you need to fine the ROM which is really just the bare bones operating system and a whole heap of wonderful settings and tweaks, AS WELL AS a package containing the Google Apps to match the ROM, known as a "gapps".
* Now go and search and find and download your ROMs.
I will start with the
CyanogenMod for this phone.
Read about it here...
http://www.addictivetips.com/android/cyanogenmod-10-1-complete-review-guide/
Start here ...
http://www.cyanogenmod.org/
Download from here
http://download.cyanogenmod.org/
I used
cm-11-20141115-SNAPSHOT-M12-i9300.zip
From the snapshots...
http://download.cyanogenmod.org/?device=i9300&type=snapshot
And the gapps from here ...
http://androidxda.net/gapps/
and used the
gapps-kk-20140105-signed.zip ... kitkat gapps to go with the kitkat CM ROM
* I found the
AOKP ROM with gapps here....
http://aokp.co/devices/i9300
* I found the
Carbon ROM here. It's a good website. Take a good look around it.
http://carbonrom.org/supported-devices/
My device is this one ...
International Galaxy S III (i9300)
So this was my download link...
http://carbonrom.org/downloads/?d=OLD/i9300/nightly
and gapps here ...
https://basketbuild.com/gapps and again choose the correct gapps or your flash won't work.
I used kitkat gapps to go with the kitkat ROM.
Android 4.4.x (Minimal Gapps) gapps-kk-20140105-signed.zip
* Copy and paste those ROMs and gapps onto the SD card in your phone or to the internal drive, it doesn't matter which. Make separate folders for each ROM and its gapps so you don't confuse them when you go to flash that new ROM on your phone.
So, boot up your phone in normal mode, plug it into your computer via that USB cable and wait until it comes up as a separate drive, then copy and paste your downloads onto your external SD card or the internal drive.
* Ready ? Once again boot to
Recovery mode. I press
Home + Volume UP + Power.
I see this...
* Use TWRP to flash the ROM along with the gapps. Select Install. Navigate to where you have those ROMs.
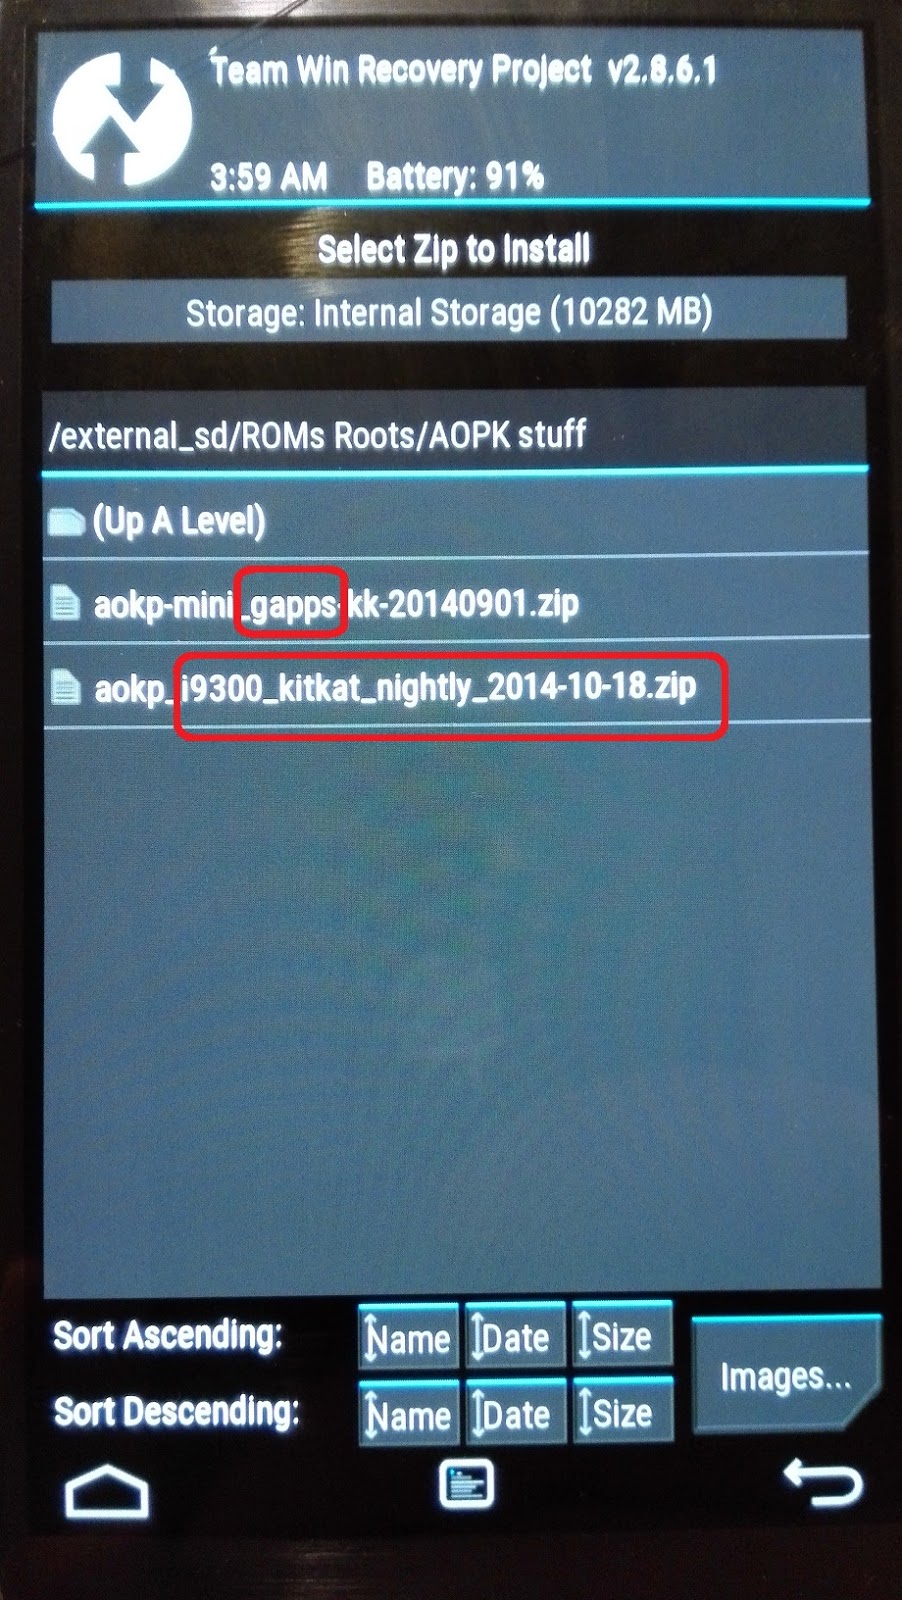
I go up one level to my external SD card.
There's my organised folders with my ROMs and gapps.
This one is the very clever AOKP ROM. This is on my test phone at the moment.
Swipe to flash. Wait for the reboot into your new ROM.
** Note that if you already have a working operating system (ROM) on your phone, you will need to WIPE first or else you will see a FAIL to install.
If it doesn't work, and it probably won't because you had the wrong gapps for the wrong ROM for your phone, WIPE and start again and read the description on your ROM carefully when you download it. I had a few failures because I didn't read carefully.
TWRP survives the Wipe.
Also try flashing just the ROM without the gapps.
* Here's some screenshots from my AOKP phone.
You can tweak anything and everything.
I use
Nova Launcher from the Google Play market.
This will be my map phone when I travel overseas. I have
Here maps and not much else on it. It'll go days without a charge.
** A note on "The SU Binary needs to be updated" messages. I quote from "
Superuser"
Superuser is the app that manages what apps on your rooted device have access to su. Apps that are granted su have elevated permissions and can modify just about any part of the system. The app was originally written by zinx, and I took it and made it much more useable. The app consists of two parts, Superuser.apk and the su binary.
Superuser.apk runs as any other app and gives you, the user, a place to see what apps you have allowed or denied, as well as view a log of what apps have used su when.
The su binary is what other apps call when they need superuser rights. The binary checks the database maintained by Superuser.apk to determine if you have already granted rights to the requesting app, and if not tells Superuser.apk to display a prompt asking you for permission.
I see this a fair bit and just press the button that says Continue. No problems so far.
Cheers. Si.
 Here's my latest find.